I know from the thousands of phone calls, texts, emails, comments, faxes, telegrams, couriers, carrier pigeons and smoke signals, I left you all anxious and more than a little sleepy after last weeks blog. The questions on every ones lips
- Will they be making Weekend at Bernies 3?
- Will Anikan oops i mean Aaron not turn to the dark side and swap name tags on the axle of someone who didn't balls up their axle.
Do you see the family resemblance?
Well Obi Wan Kenobi (aka Brett) showed me the path to the dark side was fraught with danger not to mention I'd possibly be lynched by a mob of crazed P-Far builders (that's just how we roll). When Obi Wan Kenobi dished out the brand spanking new crankset and cotter pins my heart was in my mouth and my pancreas was secreting enzymes but just quietly it does that anyway.
I hurried over to the bench to see the damage I did last week. The first cotter pin was fitting nicely and the second one was a little too tight', as the youth of today would say YeeHaa Grandma! (The tight cotter pin can be fixed with filing and since we determined last week metal doesn't grow with watering)! After cartwheeling around the shop I decided that this was surely a sign not to do any more on that part this week.
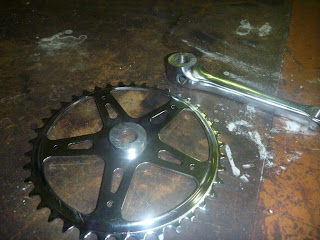
(BTW when i first drafted this blog i had included a comment to 'hopefully insert a solution here', yes I was as worried as Gaddafi should be). So I then went on to cut the chain ring off the right hand crank like below.
The basic idea is to replicate the left side I've got a bit more work to do on it with my friend the file.
After all the excitement of cutting a crooked line in metal I turned my attention to creating the rim profile. Now this is possibly one of the most exciting jobs this side of.... well my day job.
You essentially go from this view...
To this if you are really lucky....
We did this for an hour and a half. It's actually quite critical without it we wouldn't have a bike but the machine does most of the work when it feels like it.
During the week we had emails regarding the cast bearing holder. This is what is included in the course cost.
This is what a number of us prefer
*Insert boring nerdy part* Brett had made a high quality casting and discussed with a local business about getting them made. We had to have a minimum of 10 people for the foundry to do the mould and they cost around $76 per pair plus the additional machining required for the bearings to sit in. A number of us had concerns about how traditional it is, it seems there is no standard traditional in fact something similar to this style was used. The goal of this build is not to improve on the design. The simple fact is nobody alive was around who knew how these were actually built and there were many different designs so there will be some creative licence. Now if you have read this I'm so impressed I'll even throw in some chips with your burger from last week.
Now we have three weeks while those 'students' sit around and play with their cup in ball or what ever these crazy youth of today do. Next week I'll talk about the home work we've been assigned.
Now to take us out from Part III Revenge of the Axle....


hey dude,
ReplyDeletehave you been able to use the metal work skills you gained while doing time at Wacol in building your bike?
hope life is good on the outisde
Chopper
Shivs don't make themselves lucky my lack of skill in metal work make them legendary.
ReplyDeleteCHIPS, DRINK, GIRLS.............
ReplyDelete