Monday 27 June 2011

Blazing Saddles

Yeehaw partners welcome to this weeks rootin' tootin' post all about saddles, in particular blazing ones.
This week was a hiatus from class but the holy grail of ordinary bike building was thrust upon me to make a sockdolager of a saddle template!

I had been thinkin' of buying me a saddle but I was hornswoggled. I figured rightly I'd be much better at building a saddle than you know the people of the land, the common clay of the new west, such as Selle Italia, Fizik, Brooks or Ritchey. You know

Then I says to me self might'n I get me a nice brooks leather seat, but the opportunity to make somethin' more'n difficult than it needn' be seems to good to pass up. I was also of the mind the unique seating position of an ordinary bike means you need extra wide seat to distribute the load. Strange but note worthy this is a glaring oversight amongst most saddle manufacturers. Equally strange is that Authentic Frontier Gibberish isn't more popular consarn it!
Although there is an international day of celebration on 24 January each year with the Talk Like a Grizzled Prospector day.

Essentially I need to whittle out the wood into the shape of a seat. This is made more difficult as I did it while playing a banjo and chewing tobacco.

I've mentioned in an earlier post that the seat on an ordinary bike is uncomfortable after a while you end up with a raw hide as you can't change position so the rule of bum (thanks for that pun I owe you one Brett) is to go wider so it won't be a slim design found on my usual bikes.
 Note the comparison to a fairly wide modern seat.

This piece from Brett will be turned into a mold for the leather seat. This is what the seat would look like as per the mold above as per Brett's testing of the theory on how to make a saddle.


Faster'n a jackrabbit on a hot rock I unleashed my new Excalibur I've dubbed MFTPF (My Friend the Power File) and drew some random lines on the template in the hopes this will help.

MFTPF (half of which is thanks to Pete) is something I've seen my Poppa use on many occasions and it's one of his most used tools however I've rarely seen one in the shops. I finally found me one and turns out it's more fun than tickling a badger. 

This was part way through. I'm not trying to remove too much but get an improved shape.

I spent some time using sand paper made much easier when I finally realised cutting down a piece of belt sander makes a strong and fantastic curved piece sander. There is still some work to do on it particularly in the groove at the rear of the saddle. I'm going to seek feedback on it prior to cutting away too much. Whilst unlike metal wood does grow with watering but only if it's alive (there is always fine print). 
 

Hopefully with more work I'll have a saddle that will give me minutes of comfortable riding. I'm sorry y'all but mounting the saddle to the bike is a whole nother story and I have to absquatulate off. Y'all come back now ya hear!
 Raw hide!

Tuesday 21 June 2011

Carbon Rims and Karate Kid

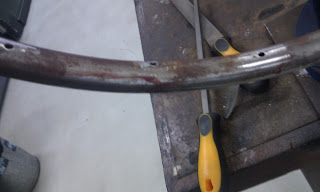
Welcome back gentle reader. This week we are discovering a little known element of building an ordinary bicycle is that the later models in and around 1885 or so had..... drum roll please .....carbon rims. I've been holding out on you as a BIG surprise as tonight we learnt about laying carbon weave and tensile strength. You'll have to excuse my little joke having you believe we were using those metal hoops as rims. Sorry but they were the frame to lay the carbon on. If you have a really close look at this photo you'll see that it has a carbon rim
Also the forks in this photo were carbon but we are using titanium for ours as this model was for racing we wanted a more comfortable ride. Oh and one last thing.
.
.
.
.
.
.
Note the spelling of comming... urban dictionary shows us how to use comming in a sentence. People's obsessions with improper spelling are comming to an apocalyptic climax.

This weeks class was all about the rims for me. I was running a little behind and there was only a couple of us left to drill out the rims. It's quite a long process drilling 120 holes for the front wheel and 40 for the back wheel.

First step was drilling the front wheel. First you drill a 4mm hole through both layers with MFTDP (My friend the drill press) every second hole then flip the rim and do the other holes to keep 1BTKB7DH (1 better than Kevin Bacon 7 degrees hole)

Then you drill a 7mm through the first layer of metal. This is so you can tweak the spoke nipple on the end (Heh heh heh).


This took an hour of up and down, then I had to clean up my small rim from the brazing. From this...
To this... since I forgot to take a photo of it.
 I then marked out the twenty spokes.

And back to MFTDP for another 40 holes as per the large rim. However this was not as easy as it might seem. I had to channel my third sensei Keisuke Miyagi aka Mr Miyagi as both Sensei Penguin and Sensei Spongebob were at a meditation retreat teaching young Jedi's how to make crappy prequels and lift rocks with their minds (I suspect so they can stone unhappy fans from a safe distance).


In the directors cut of Karate Kid after Daniel son learnt how to paint a fence, wax about a million cars he then learnt the special advanced maneuver the 1BTKB7DH (1 better than Kevin Bacon 7 degrees hole)

I am pleased to report I have reached the level of Blue Onesy in the ancient art of 1BTKB7D. Mr Miyagi is very pleased.
Once all the holes were drilled I then needed to use MFTF to remove the sharp metal dags.

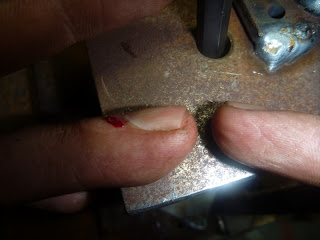
As usual this was not without injury, nope that is not a smear of rust on that rim it's real DNA impregnated vampire appetiser. Stupid sharp bits.

Once this was done I made my name plates. As the rims are to be sandblasted and powder coated we made a special plate and wired it to the rim so we know who's is who's. I used the punch and didn't hit my fingers. Yay me!
I got all excited thinking I'd finished until I found out I had to do a second one. Since I'd already broken the second last hacksaw blade on the first tab. The genuine woman aka Janine took pity on this slow boy from the wrong side of the tracks and cut the second tab. This task of good will maintained my unblemished record of outsourcing in each class.

Here is me proud as punch holding my rims.

Thanks third sensei Mr Miyagi your deeply spiritual guidance helped me through this weeks lesson. You are an inspiration to us all.

Monday 13 June 2011

It's a great way to stay in shape

Today was a great day to stay in shape. To my three loyal followers sorry there is NPFRC (no penny farthing related content) this week while we had a public holiday. Although my finger is a lot better thanks for asking. Did you see how I subtly worked in that I now have 3 followers! My quest for blogging immortality is coming to fruition. I'll soon knock Fatty off his lifetime achievement perch

This morning I decided to go for a ride on the roadie. I like my road bike it has a carbon frame (since all lifeforms on earth are based on carbon I wonder why it's so expensive?) it's a nice fast light bike and a pleasure to ride. With a nut bar in the back of my jersey I headed off towards Redcliffe on a regular ride.

On the way out I was struck by an idea how about a bridge challenge! A 7 bridge challenge! I would ride over the major bike and road bridges in Brisbane! I would use exclamation marks with reckless abandon! Take! that! society! In! your! face! As with all major life decisions I channelled my sensei who spoke to me and showed me what I need to ride over!

Whilst my sensei has never steered me wrong I checked with my emergency back up penguin sensei who showed me the light.

Well that clinched it, it was obvious both masters agreed, I will ride over lots of bridges.

Thinking about this challenge made me realise my mathematics skills are really poor and I would actually need to ride over 10 bridges (plus one nut bar wasn't going to cut the mustard nor curdle the cream). So the TBBC (Ten Bridge Bike Challenge) was established. The three ground rules est 7:45am 13/06/2011 -
1. I needed to ride over the entire bridge not just half way and turn back,
2. What ever bridge I decided to include was part of the challenge
3. That was about it.

The bridges in order of completion were
Ted Smout Memorial Bridge (Bridge to Redcliffe) July 2010
Sir Leo Hielscher Bridge (Gateway Bridge) opened June 2010
Story Bridge opened July 1940 (Bradfield Highway) 
Goodwill opened October 2001
Victoria opened 1969
Kurilpa opened October 2009
William Jolly opened March 1932
Go Between opened July 2010
Eleanor Schonell (Green Bridge) opened December 2006 
Jack Pesch (Indooroopilly) opened October 1998
I also went over the land bridge at Herston but since it doesn't go over water and stuffs up the nice ten with a strange and decidedly bizzare looking 11 I've discounted it, in addition I haven't included Centenary Bridge as I forgot about it. The rules dating back to several hours ago indicate it is perfectly acceptable to not count it.

The first bridge Ted Smout it about 20kms from home, it's a looong bridge (2.74kms), the old bridge was so rough you needed new fillings after each time you rode it. The new one is very nice wide and separate peds and cycling with a line.


The second bridge Gateway was about 25kms from the first. It is a decent climb this bridge also a little controversial when it was opened as some genius thought that 10kmh was a realistic speed. I've heard of people doing comfortably and safely 60kmh down (when nobody is around of course)

Next stop was the Story bridge a decent hike from the Gateway. I regularly use this bridge to commute. It's pretty busy and a bit narrow and you get the pleasure of breathing the fumes from all the cars. Generally i just want to get across it. 'Intersting' note it is the shortest highway in Australia.

Goodwill bridge was a big deal for cyclists and pedestrians a missing critical link. I use it regularly as does thousands and thousands of others. There can be tension between users but rarely any problems. 

Victoria bridge is home of the worlds thinnest on road bike lanes. Even on my road bike my lust ledges (aka love handles) hang over the edge (this photo is from the off road path note the Aaron 'licence plate', pretty stylish hey!)

Kurilpa bridge had a fairly controversial design kind of like those images of spider webs on drugs. It's surprisingly steep coming up from the south side. 

The William Jolly was one of the bridges I forgot about when I first counted in my head the number of bridges. Whilst you can ride across it, the path design is suboptimal generally I use the roads

Go between is a toll bridge for cars and free for bikes and pedestrians. It's fantastic they included cyclists and peds but it is the fifth bridge in the space of a couple of kms.

I took this photo to show the exciting design features. It's cyclists only on this side and pedestrians on the other.

The Eleanor Schonell Bridge really opened up access to University of Queensland. You'll note the plastic bag special effect it is a special effect exclusive to my camera.

The final official bridge was the Jack Pesch an extremely popular bridge and home to the worlds largest bollard. It is the most popular tourist attraction in Brisbane even on an international level far outshining the biggest ball of twine in Minnesota. Whilst that guy may look normal he is actually a giant standing 10m away from the bollard.

And here is my bike on the bridge. Note in the background there used to be pontoons along there but the floods destroyed them.

This was a picture from the land bridge but please don't look at it as it doesn't count.

The TBBC was complete with about 107.5kms travelled. I ate one nut bar and stopped and bought a snickers and it really satisfied.

Thanks sensei spongebob for your guidance to complete the TBBC.


Thanks Sensei penguin for your confirmation of the guidance to complete the TBBC!

In a perfect world they would be sensei spongebob penguin

Tuesday 7 June 2011

Stop Hammer Time


Yes Stanley Kirk Burrell aka MC Hammer it was indeed hammer time.

Tonight i was working on putting the flat end bit on the spoke. To do so i used this tool Brett built i mentioned in an earlier post. For ease of reference I've outlined the process in the following 10 easy steps.

1. First you put the spoke in and tighten the nuts
2. You then tap down to this height of two washers
3. Then you attach this metal thing to the top and swing back to hit it
4. You then hit your ring finger with the hammer really hard


5. You then jump around for a while much to the amusement of all around you.

6. Then you feel nauseous get the sweats and want to lie down.

7. You get empathy and compassion from all concerned and your heart fills with so much joy and love you feel like it will explode. They also suggested humour is the best medicine which I almost overdosed on.

8. Then Janine saves the day and bandages it up for you.
9. You take your cup and ball and go home early much to your displeasure as it hurts to move and this class is the highlight of your week. You come to the sad realisation that while MC Hammer said 'you can't touch this' he never indicated 'you can't smash this with a hammer'. But he was psychic about the hammer time stopping me. Spooky!

10. You write a short and painful blog with one hand take some pain killers and go to bed.

That my friends is the abridged version how to put the end bit on spokes.