Tuesday 26 April 2011

Welcome Back Cotter

Welcome back
To that same old place that you laughed about.


This weeks blog I'm sure will have the staying power of a folksy mediocre 1970's television show. The annals of history have been altered, generations ahead will be learning from this blog in school and marvelling at the sophisticated wordplay and social commentary like the following....
Whilst drugs will make this post more understandable... drugs are bad mkay...

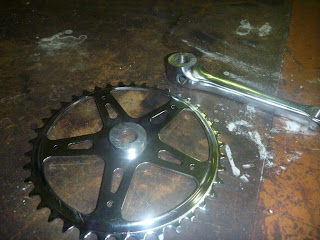
In my last post I mentioned I was partaking in three elements of homework. The bling-bling mentioned previously and the second part I tackled today was getting the cotter pin to fit and cranks to run straight. As I mentioned in an earlier post I ballsed up the essential crank and cotter pin connection. Yet gentle reader, there was still hope with the new cranks and cotter pin! It looked like all was not lost, that indubitably would plummet me into a bottomless pit of despair until even this hilarious video didn't help (the zinger 18 seconds in will have you in stitches).

Now was the real moment of truth could I get it back into some form of shape? After cutting the crank in the last class
I then had to get the crank to match the other side using a grinder then MFTF (my friend the file). I got it the same width but realised the other crank was tapered so from this....


to this

I know you are wondering just how did this happen was it daemons or a wizzard of kinds? Well hold onto your hats and socks my friends it was with MFTF. With this part done I could turn my attention to the mischievous cotter pin holding section (the flat bit cut into the crank). After more time with MFTF I got it to within a poofteenth of being level.

There might or might not been a whole lot of dodgy filing going on.... I'm going to take it to class to discuss how to finish off the tiny change needed to iron out that poofteenth.

Stay tuned gentle reader for the next no doubt mediocre and more than a little folksy post.
Sunday 17 April 2011

Bling-bling

Last week I indicated we are on holidays for three weeks while kids play with their cup and balls.Being the mature man about town I am I've taken home three mini projects to keep the bike going.

This weekend I decided to have a go at the brake, in particular the brake shoe. I'm very excited about this part as it'll make the bike road legal and is made of brass which is 'ye olde bling-bling'.

Now all great movies have bling-bling (check out Terminator 2 how much bling does the T1000 have!) but more importantly a montage in them such as Rocky IV, Team America World Police (In this case with a bizarre Harry Potter twist) and Karate Kid, so it's obvious what i need to do create my own montage of part 1 of my homework the brake.

Nothing says bling-bling and inspiration like the Coasters song Yakety-Yak from 1958.

Below is a photo I took in class as an approximate before and after although the brake on the left hasn't been finished.

There is still a bit more cut and polish needed to finish it off but that gives you the idea. I used a combination of a small bit of angle grinder, rotary tools and files. I think I'll need to buy a curved mill file to finish it off in and around the boot of the brake.

As Brett has indicated they are not what you'd call powerful brakes but they will help get your bike under control. Remember when you were a kid putting your front foot on your wheel to slow you down? Yep that's pretty much it. Please enjoy the gratuitous use of bling below as a fitting finale to this weeks post.

Source

Bling-bling out.

Monday 11 April 2011

Part III Revenge of the Axle

Da da da da da daa daa da daa
I know from the thousands of phone calls, texts, emails, comments, faxes, telegrams, couriers, carrier pigeons and smoke signals, I left you all anxious and more than a little sleepy after last weeks blog. The questions on every ones lips
- Will they be making Weekend at Bernies 3?
- Will Anikan oops i mean Aaron not turn to the dark side and swap name tags on the axle of someone who didn't balls up their axle.
 Do you see the family resemblance?

Well Obi Wan Kenobi (aka Brett) showed me the path to the dark side was fraught with danger not to mention I'd possibly be lynched by a mob of crazed P-Far builders (that's just how we roll). When Obi Wan Kenobi dished out the brand spanking new crankset and cotter pins my heart was in my mouth and my pancreas was secreting enzymes but just quietly it does that anyway.
I hurried over to the bench to see the damage I did last week. The first cotter pin was fitting nicely and the second one was a little too tight', as the youth of today would say YeeHaa Grandma! (The tight cotter pin can be fixed with filing and since we determined last week metal doesn't grow with watering)! After cartwheeling around the shop I decided that this was surely a sign not to do any more on that part this week.
(BTW when i first drafted this blog i had included a comment to 'hopefully insert a solution here', yes I was as worried as Gaddafi should be). So I then went on to cut the chain ring off the right hand crank like below.

The basic idea is to replicate the left side I've got a bit more work to do on it with my friend the file.

After all the excitement of cutting a crooked line in metal I turned my attention to creating the rim profile. Now this is possibly one of the most exciting jobs this side of.... well my day job.

You essentially go from this view...
 To this if you are really lucky....

We did this for an hour and a half. It's actually quite critical without it we wouldn't have a bike but the machine does most of the work when it feels like it.

During the week we had emails regarding the cast bearing holder. This is what is included in the course cost.


This is what a number of us prefer
*Insert boring nerdy part* Brett had made a high quality casting and discussed with a local business about getting them made. We had to have a minimum of 10 people for the foundry to do the mould and they cost around $76 per pair plus the additional machining required for the bearings to sit in. A number of us had concerns about how traditional it is, it seems there is no standard traditional in fact something similar to this style was used. The goal of this build is not to improve on the design. The simple fact is nobody alive was around who knew how these were actually built and there were many different designs so there will be some creative licence. Now if you have read this I'm so impressed I'll even throw in some chips with your burger from last week.

Now we have three weeks while those 'students' sit around and play with their cup in ball or what ever these crazy youth of today do. Next week I'll talk about the home work we've been assigned.

Now to take us out from Part III Revenge of the Axle....

Tuesday 5 April 2011

The sequel

Now in movies they say the sequel rarely is as good as the original. With the obvious exception of Weekend at Bernies 2.

Will the excitement of the first week be maintained or even enhanced? Will they realise Bernie is actually dead... will the Hardy Boys find the lost treasure... Read on my friends...

Walking into the class I was still a little nervous about sitting in the corner like this...
however I sucked up all my "maleness" and "she'll be rightness" I could and pressed on into the workshop.

BREAKING NEWS
We now have a genuine woman in the class. This revelation had all the men sucking in their stomachs and pushing out their chests. The effort of this removed all the oxygen from the room creating a vacuum and we all passed out.

Upon regaining consciousness and realising that she had set up all the work spaces and completed the task for this week and was ready to go home we realised she was far more competent than we were.

For those awestruck by my onesy in my first post I'm pleased to report was a distinct undertone of onesy jealousy this week from members of the class. Secretly I'm not surprised as I did 'bring it' in a big way!

Now this week we broke off into a few groups. A few people kept rolling the rims, a few working on turning the rims into wheels (as above), one person at a time on the spoke machine, the rest of us started working on the axle.
From this
Then this
to this

Our job was to create a flat spot starting 6mm in from where the axle tapers in and 8mm across for the cotter pin. We used a hack saw to make some shallow cuts (around 2mm) then a metal file to even it up. Then the really difficult bit was repeating it precisely on the other side without a frame of reference. It's a fairly precise job and I'm pleased to say I managed to stuff it up. The excuses are many including
- only 3 cotter pins with the 6 of us doing the same job all needing two of them so we could check our progress.
- a cotter pin hog holding onto two of them while he got his so precise NASA is going to use them on the next space flight. (there is always one in every group like this)
- I was using too coarse a metal file that took too much off.
Turns out that you can get bigger cotter pins so the world is safe from floppy cranks.

Look at this happy chappy before he realised metal doesn't grow back no matter how much you water it.
I'm loving this ye olde effect it really gives it the olde timey goods.


Ps. I realise I made an error in last week posts one of the key reasons penny farthings were made obsolete was the in 1888, when John Dunlop re-invented the pneumatic tire for his son's tricycle.

Pps. If you are still reading this far I'm seriously impressed. I would love to shake you by the hand and take you out for a burger. Considering the number of people reading this I'll come pick you up at 7pm we'll only need one car.